
Documentation
Uena - React (Redux + NextJS) Saas Admin Dashboard Template
Uena is a popular open source WebApp template for admin dashboards and admin panels. It’s responsive HTML template, which is based on the Bootstrap framework. It utilizes all of the Bootstrap components in design and re-styles many commonly used plugins to create a consistent design that can be used as a user interface for backend applications.
- Skype: rahulxarma
- Gmail: dexignzones@gmail.com
- User Profile
- Timeline
- Summernote
- Markdown
- Many Charts Options
- Input Slider
- Advanced Form Elements
- Invoice
- Social
- Form Examples
- Form Validation
- Form Wizard
- Datatable
- Table Sorting
- React Table
- Bootstrap Table
- Date Picker
- Noui Slider
- Sweetalert
- Toaster
- Rating
- Lightbox
- Scroll
- Chatbox
- Router
React.JS Installation & Setup A JavaScript library for building user interfaces.
Installing
Make sure if NODEJS is installed on your computer
npm install -g create-react-app
command from your teminal to install React Globally.
Install npm :-
Run
npm install command from your project
directory. It will create 'node_module' folder in this all
dependency files will be install with this command.
Run Project :-
Run
npm run dev command from your project directory.
With is command file will be compiled and it will be loaded
on local server `http://localhost:3000`.
Production Build :-
Run
npm run build Builds the app for production to
the `build` folder. It correctly bundles React in production
mode and optimizes the build for the best performance.
Further help :-
To get more help on the
nextjs.js checkout
nextjs
Note: You can learn more in the Create Next App Documentation. To learn Next, check out the Next Documentation.
package.json
 dependencies: {
    "@date-io/date-fns": "^1.3.13",
    "@material-ui/core": "^4.11.1",
    "@material-ui/pickers": "^3.2.10",
    "@metismenu/react": "0.0.2",
    "@svg-maps/usa": "^1.1.1",
    "@svg-maps/world": "^1.0.1",
    "@tinymce/tinymce-react": "^3.12.6",
    "@y0c/react-datepicker": "^1.0.4",
    "apexcharts": "^3.27.1",
    "axios": "^0.21.1",
    "bootstrap": "^5.0.2",
    "chart.js": "^2.9.4",
    "chartist": "^0.11.4",
    "chartjs-plugin-streaming": "^1.8.0",
    "create-react-class": "^15.7.0",
    "date-fns": "^2.16.1",
    "firebase": "^8.7.1",
    "formik": "^2.2.9",
    "match-sorter": "^6.3.0",
    "material-ui-color-picker": "^3.5.1",
    "moment": "^2.29.1",
    "next": "10.0.8",
    "nouislider-react": "^3.4.0",
    "pickadate": "^5.0.0-alpha.3",
    "react": "^17.0.1",
    "react-apexcharts": "^1.3.9",
    "react-bootstrap": "^1.6.1",
    "react-bootstrap-daterangepicker": "^7.0.0",
    "react-chartist": "^0.14.4",
    "react-chartjs": "^1.2.0",
    "react-chartjs-2": "^2.11.1",
    "react-color": "^2.19.3",
    "react-dom": "^17.0.1",
    "react-dropzone-uploader": "^2.11.0",
    "react-linear-gradient-picker": "^1.1.4",
    "react-multiselect-dropdown-bootstrap": "^1.1.0",
    "react-multistep": "^5.1.0",
    "react-perfect-scrollbar": "^1.5.8",
    "react-redux": "^7.2.4",
    "react-select": "^4.3.1",
    "react-sparklines": "^1.7.0",
    "react-svg-map": "^2.2.0",
    "react-table": "^7.7.0",
    "react-to-print": "^2.12.6",
    "react-toastify": "^7.0.4",
    "recharts": "^2.0.9",
    "redux": "^4.1.0",
    "redux-devtools-extension": "^2.13.9",
    "redux-thunk": "^2.3.0",
    "simple-react-lightbox": "^3.6.6",
    "sweetalert": "^2.1.2",
    "yup": "^0.32.9"
  },
  devDependencies: {
    "eslint": "7.29.0",
    "eslint-config-next": "11.0.1"
  }
Create a PageHow to create a custom page
1. Create page component pages\MyPage.js
import React from "react";

export function MyPage() {
  return(
   <h1>Hello!</h1>
  )
}
RoutingLinking between pages
The Next.js router allows you to do client-side route transitions between pages, similar to a single-page application.
A React component called Link is provided to do this client-side route transition.
import Link from 'next/link'

function Home() {
  return(
	<ul>
	   <li>
		<Link href="/">
		  <a>Home</a>
		</Link>
	   </li>
	   <li>
		<Link href="/about">
		  <a>About Us</a>
		</Link>
	   </li>
	   <li>
		<Link href="/blog/hello-world">
		  <a>Blog Post</a>
		</Link>
	   </li>
	</ul>
  )
}
export default Home;
In the example above we have multiple links, each one maps a path (href) to a known page:
- / → pages/index.js
- /about → pages/about.js
- /blog/hello-world → pages/blog/[slug].js
Any in the viewport (initially or through scroll) will be prefetched by default (including the corresponding data) for pages using Static Generation. The corresponding data for server-rendered routes is not prefetched.
Vercel (Recommended) Getting started
If you haven’t already done so, push your Next.js app to a Git provider of your choice: GitHub, GitLab, or BitBucket. Your repository can be private or public.
Then, follow these steps:- Sign up to Vercel (no credit card is required).
- After signing up, you’ll arrive on the “Import Project” page. Under “From Git Repository”, choose the Git provider you use and set up an integration. (Instructions: GitHub / GitLab / BitBucket).
- Once that’s set up, click “Import Project From …” and import your Next.js app. It auto-detects that your app is using Next.js and sets up the build configuration for you. No need to change anything — everything should work just fine!
- After importing, it’ll deploy your Next.js app and provide you with a deployment URL
- To get more help on the deployment checkout Deployment
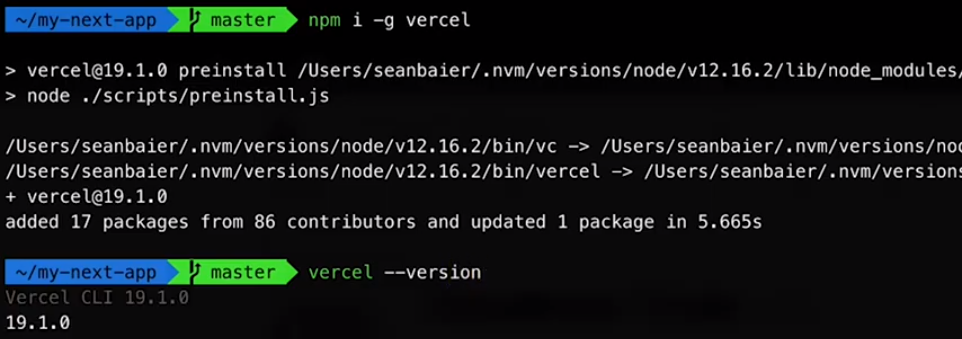
Step-1: Run npm i -g vercel

Step-2: Check version vercel --version
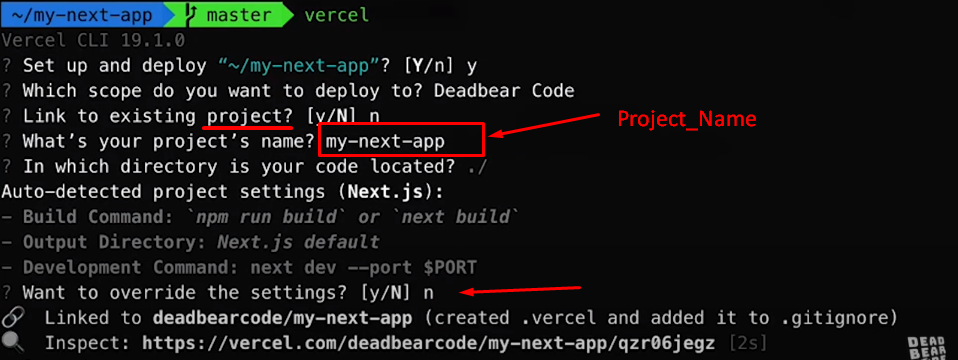
Step-3: login in vercel vercel login

Step-4: write your mail abc@example.com

Step-5:
Now, answer some questions
1. do you want deploy project on vercel.
2. Link to existing project?
3. write your project name.
4. In which directory is your code located?
Folder Directories
- public
- icons
- avasta
- feather
- flaticon
- font-awesome-old
- helveticaNeue
- icomoon
- line-awesome
- material-design-iconic-font
- simple-line-icons
- themify-icons
- images
- avatar
- big
- browser
- card
- contact
- demo
- pattern
- product
- profile
- tab
- table
- styles
- vendor
- metismenu
- perfect-scrollbar
- scss
- abstracts
- base
- components
- app
- charts
- forms
- ico
- map
- tables
- uc
- ui
- widget
- layout
- footer
- header
- rtl
- sidebar
- theme
- typography
- version-dark
- version-transparent
- pages
- main.scss
- icons
- src
- components
- apps
- bs
- chart
- forms
- login1
- plugins
- table
- widgetBasic
- widgetBasic
- InboxTable.js
- PageTitle.js
- Table.js
- useWindowSize.js
- layouts
- header
- AuthLayout.js
- Demos.js
- ErrorsLayout.js
- Footer.js
- Layout.js
- PreLoader.js
- Settings.js
- Sidebar.js
- uena
- analytics
- home
- orderDetail
- orderList
- CustomerModal
- redux
- action
- redux
- store.js
- firebaseConfig.js
- utils.js
- components
- pages
- _app.js
- apps
- chart
- form
- pages
- plugins
- table
- ui
- package.json
- React Redux Click to See
- Nextjs Click to See
- Firebase Click to See
- Google fonts are used in the template. Krub
- Font Awesome: Click to See
- All Images are used: Pexels.com
- Bootstrap framework Bootstrap
- Noui Slider Click to See
- Datatables Click to See
- React Table Click to See
- Sparkline Click to See
- Chartjs Click to See
- Apexchart Click to See
- Sweet Alert Click to See
- Simple React Lightbox Click to See
- Tiny MCE Editor Click to See
- Uc Select2 Click to See
- Redux Form Click to See
- Formik Click to See
- Material Design Click to See
- React Perfect Scrollbar Click to See
- React Svg Map Click to See
Layout Layout is controlled by settings object LayoutSettings inside src/context/ThemeContext.js
Layout.js
  import Router from "next/router";
  import { Fragment, useEffect, useState } from "react";
  import { connect } from "react-redux";
  import { getUser } from "../redux/action/auth";
  import Demos from "./Demos";
  import Footer from "./Footer";
  import ChatBox from "./header/chatbox/ChatBox";
  import Header from "./header/Header";
  import NavHeader from "./header/NavHeader";
  import PreLoader from "./PreLoader";
  import Settings from "./Settings";
  import Sidebar from "./Sidebar";
  const Layout = ({ children, getUser, user }) => {
    const [height, setHeight] = useState();
    const [active, setActive] = useState(false);
    useEffect(() => {
      setHeight(window.screen.height - 100);
      getUser();
      setActive(document.querySelectorAll(".metismenu a") ? true : false);
      if (!user) {
        Router.replace("/pages/login1");
      }
    }, [user]);

    return (
      <Fragment/>
        {!active ? (
          <PreLoader />
        ) : (
          <div id="main-wrapper" className="show">
            <NavHeader />
            <ChatBox />
            <Header />
            <Sidebar />
            <div className="content-body" style={{ minHeight: height }}>
              <div className="container-fluid">{children}</div>
            </div>
            <Demos />
            <Settings />
            <Footer />
          </div>
        )}
      </Fragment>
    );
  };
  const mapStateToProps = (state) => ({
    user: state.auth.users,
  });

  export default connect(mapStateToProps, { getUser })(Layout);
Redux Redux is a predictable state container for JavaScript apps..
1. Redux Folder Structure
- src
- redux
- action
- apps.js
- auth.js
- dashboard.js
- header.js
- tableAction.js
- themeAction.js
- useWindowSize.js
- utils.js
- widget.js
- type.js
- reducer
- appsReducer.js
- authReducer.js
- dashboardReducer.js
- headerReducer.js
- index.js
- tableReducer.js
- themeReducer.js
- utilsReducer.js
- widgetReducer.js
- action
- redux
- pages
- _app.js
2. Redux setup src\reudx\redux\index.js
import { combineReducers } from "redux";
export default combineReducers({});
3. Redux store setup src\reudx\store.js
  import { applyMiddleware, createStore } from "redux";
  import { composeWithDevTools } from "redux-devtools-extension";
  import thunk from "redux-thunk";
  import rootReducer from "./reducer";

  const initialState = {};

  const middleware = [thunk];

  const store = createStore(
    rootReducer,
    initialState,
    composeWithDevTools(applyMiddleware(...middleware))
  );

  export default store;
4. Redux store connect with apps src\pages\_app.js
// redux
import { Provider } from "react-redux";
// action
import store from "../src/redux/store";

function MyApp({ Component, pageProps }) {
  return (
     <Provider store={store}/>
       <Component {...pageProps} />
     </Provider/>
  );
}

export default MyApp;
5. Redux connect with component
import { connect } from "react-redux";
const Components = () => {
  return </></>
};

const mapStateToProps = (state) => {};
export default connect(mapStateToProps, {})(Components);
Firebase Firebase is a platform developed by Google for creating mobile and web applications.
Firebase :-
Run
npm install firebase command from your teminal to install firebase.
import firebase from "firebase/app";
import "firebase/auth";
let app;
  app =
    !firebase.apps.length &&
    firebase.initializeApp({
    apiKey: "AIzaSyD-cUa8H0rV9aeT_bMFUlPsWx5zGe5TBbo",
    authDomain: "uenareact.firebaseapp.com",
    projectId: "uenareact",
    storageBucket: "uenareact.appspot.com",
    messagingSenderId: "1046830238584",
    appId: "1:1046830238584:web:0b7b4b53bb9650977f168d",
    measurementId: "G-W86K7QM5P9",
  });
export const auth = app && app.auth();
export default app;
For more information of firebase Click here
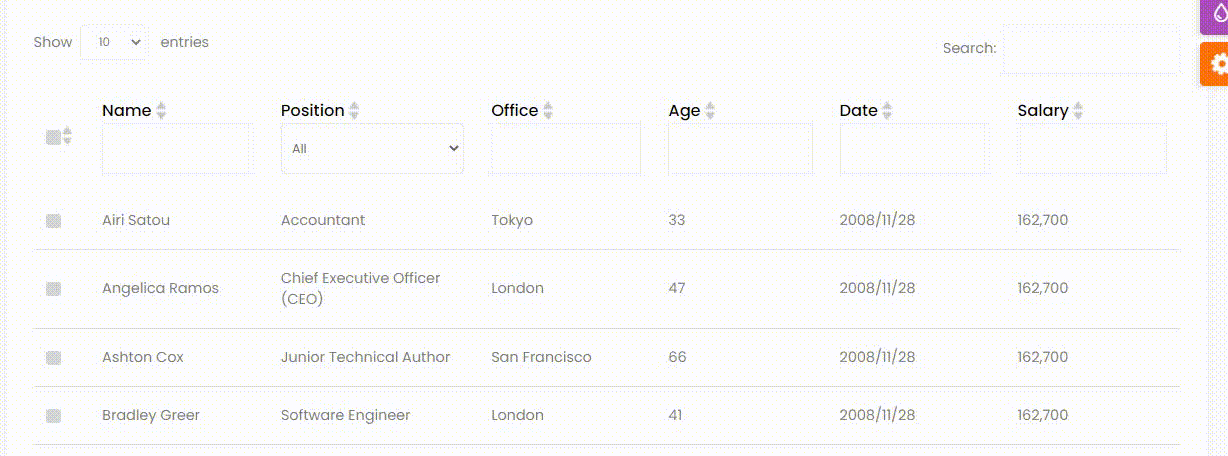
Table In table you can search data by globaly & individual column
Table Searching :-
Once again, thank you so much for purchasing this template. As I said at the beginning, I'd be glad to help you if you have any questions relating to this template.
REGULAR SUPPORT : You have in template support if you face any issue with the usage of it then you can contact us on below Email ID.
EXTENDED SUPPORT : Development it is chargeable according to your requirement. For that you need to mail us your requirement on below Email ID.
COST OF SERVICE : Depends on the hours required. But as you are already using our template we have discounted rates for our template customer.
EXTENDED LICENSE : With the Extended Support we also include Extended License. So you save much more with your investment than you will with purchasing Regular License and later buying Extended one + Development cost.
You will get a quick reply from our team and feel free to contact us. We don’t charge for requirement discussion so don’t worry.
Contact Us : rahulxarma@gmail.com
Skype : rahulxarma